
I would start with one priority role and measure qualified applications, not page views. That gives your recruitment content a clear purpose: help you reach suitable people, reduce repeated questions, and cut time spent screening poor-fit applications.
I use five steps to connect content to hiring results:
- Set hiring goals: Write a role brief, agree on qualification criteria, and record a 60- to 90-day performance baseline or audit your recruitment health.
- Define your audience and messages: Identify what matters to each talent group and support your employer claims with facts.
- Plan the content: Answer hiring questions at each stage, with a calendar tied to your open roles.
- Choose channels and owners: Use applicant-source data to decide where to publish and who approves each asset.
- Measure and adjust: Review qualified applications, offer acceptance, time to fill, and cost per hire monthly.
More content is not the goal. <u>Better hiring results are.</u> Start with one role, one accountable owner, and a two- to four-week publishing cycle, then use the results to guide your next spend.
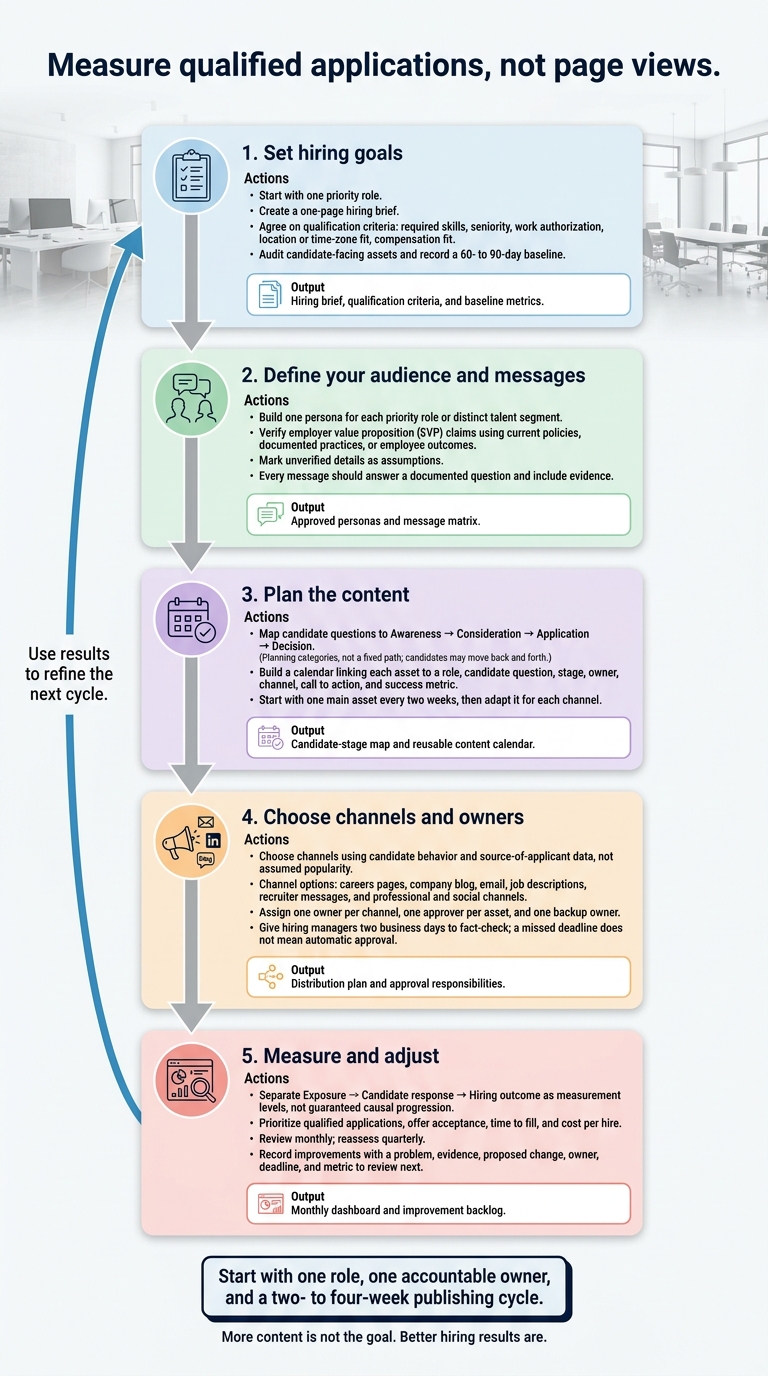
5 Steps to Build a Recruitment Content Strategy
Step 1: Set Hiring Goals for Your Content
Define Priority Roles and Content Goals
Create a one-page hiring brief for each priority role. Include the number of hires, start date, seniority, employment type, location, U.S. time-zone expectations, pay range, required and preferred skills, and the business reason for hiring. Separate confirmed requirements from assumptions. Rank roles by urgency and their impact on growth.
Set one content goal per brief, with a role, audience, deadline, owner, channel, and metric. Agree with the hiring manager on what counts as a qualified application: required skills, seniority, work authorization, location or time-zone fit, and compensation fit. Measure qualified applications, not total volume, so your team focuses on people who meet the hiring requirements.
Use the brief to build the talent personas and message matrix in Step 2.
Audit Content and Record Baseline Metrics
Audit every candidate-facing asset before publishing more content. Review careers pages, job descriptions, employee stories, recruiter outreach, social profiles, emails, application forms, interview details, and employer reviews.
In a spreadsheet, record each asset’s owner, factual claims, call to action, and required updates. Flag outdated benefits, conflicting flexibility or remote-work claims, missing interview stages, and application barriers. Check claims against current working conditions before approving them.
Establish a 60- to 90-day baseline using careers-site analytics, your applicant tracking system, and recruiter records. Track careers-page and job-page visits, social and email click-through rates, recruiter-outreach response rates, and drop-off at each application step.
Then track qualified applications per role, application conversion rate, applicant source, time to fill, and cost per hire. Use consistent definitions:
- Application conversion rate: Completed applications divided by careers-page or job-page visitors.
- Time to fill: Calendar days from requisition opening to offer acceptance.
- Cost per hire: Total recruiting costs divided by hires. Include labor, advertising, agencies, technology, travel, and employer-brand production.[1]
These figures give you a benchmark for Step 2’s audience and message decisions, linking content performance to hiring outcomes, time, and cost.
Break down results by role, source, location, and seniority so averages don’t hide weak targeting. Label missing data and unusual conditions, such as a hiring freeze or compensation change.
Have the hiring manager confirm priorities and qualification criteria, the recruiter confirm stages and objections, and HR verify pay, benefits, work authorization, and location claims. Assign one accountable brief owner and a review date.
sbb-itb-a23bd6a
Step 2: Define Talent Audiences and Employer Messages
Create Role-Specific Talent Personas
Use the hiring brief from Step 1 to build one persona for each priority role or distinct talent segment. Base it on job-relevant evidence: required skills and experience, seniority, career goals, work preferences, candidate concerns, preferred information sources, and decision criteria.
Check each draft with current employees in similar roles, recent candidates, and offer-decline feedback. Mark unverified details as assumptions so your team can separate evidence from guesswork.
Focus each persona on the priorities that shape decisions for that role. Personas should guide communication, not exclude people. Avoid assumptions based on age, gender, race, or family status, and separate must-have requirements from preferences.
Verify Your EVP and Map Your Messages
Your employer value proposition (EVP) explains why someone would work at your company. It covers rewards, benefits, development, culture, and daily work.[4][6]
Test each theme through employee interviews, surveys, and candidate feedback. Check claims across teams and levels, then support them with current policies, documented practices, or employee outcomes. Label any unsupported claim as unverified.
Build a messaging matrix with one row for each documented candidate question. Record the audience, question, message, supporting evidence, format, channel, and recruitment stage. Include an owner and review date.
Use the matrix to keep your hiring messages focused: every message should answer a documented question and include evidence. Assign it to the right asset, channel, and stage so your team knows where and when to use it.
For U.S. roles, use the work-arrangement row to specify location, office attendance, time zones, and travel requirements. Add a compensation row that separates base pay from bonus, commission, equity, and benefits. Before publishing, have HR or legal counsel check applicable state and local pay-transparency rules, as disclosure requirements vary by jurisdiction.[2][3][5]
Use the approved personas and message matrix to plan content in Step 3.
The Best Recruitment Marketing Strategies Start With the Career Site
Step 3: Plan Content for the Candidate Journey
Use the personas and message matrix from Step 2 to identify the questions candidates need answered at each stage. Focus on gaps that slow hiring or cause candidates to leave the process.
Match Content to Each Recruitment Stage
Review your messaging matrix, recruiter notes, interview feedback, candidate surveys, and application analytics. Prioritize gaps behind repeat questions or drop-off, and flag process problems that content alone cannot fix.
Map those questions to four stages. These are planning categories, not a fixed path: candidates may move back and forth. Use each metric as a signal of how well your content supports hiring outcomes.
| Stage | Information to provide | Next action | Primary metric |
|---|---|---|---|
| Awareness | Company direction, growth news, employee perspectives, and project stories | Visit the careers page | Qualified visits |
| Consideration | Team structure, manager expectations, working conditions, and development | Explore relevant roles | Engaged sessions |
| Application | Role responsibilities, required qualifications, interview stages, preparation, and expected timelines | Complete an application | Completed applications |
| Decision | Manager support, onboarding, and first-90-day expectations | Accept the offer and prepare to start | Offer acceptance |
Publish process details before candidates reach the relevant stage. Explain who will join interviews, what preparation is required, expected response times, and whom to contact with questions.
Use pipeline updates to communicate stage changes, timeline shifts, or company news. Only promise response times your team can meet. If those expectations change, tell active candidates.
Once the stage map is clear, turn it into a reusable calendar.
Build a Reusable Content Calendar
Create one row per asset, linking a candidate question to a role and journey stage. Record the topic, priority audience, candidate question, EVP theme, format, evidence, owner, reviewer, publication date, channel, call to action, and success metric. Connect each asset to its hiring campaign.
Use full U.S. dates and include the time zone.
For example: October 9, 2026, at 10:00 a.m. ET.
Start with one main asset every two weeks, then adapt it for each channel. Prioritize evidence-backed employee profiles, role articles, project stories, hiring-manager perspectives, and process explainers. Schedule these before priority hiring campaigns begin so candidates have answers when they need them.
Review employee profiles and process guides at least quarterly. Update affected assets immediately when roles, policies, teams, or timelines change. Keep the careers site as the source of truth.
Use the calendar to identify the channels each asset needs. Step 4 assigns owners and distribution.
Step 4: Choose Channels and Assign Responsibilities
Use the content calendar from Step 3 to give each asset a channel and an owner.
Compare Channels and Repurpose Content
Choose channels using candidate behavior and source-of-applicant data, not assumed popularity. Match each channel to the persona and stage defined in Steps 2 and 3. This helps you direct production time and budget toward channels that support hiring.
| Channel | Target audience | Recruitment purpose | Production effort | Cost considerations | Measurement method |
|---|---|---|---|---|---|
| Careers pages | Candidates researching the employer | Explain the EVP and direct candidates to roles | Copy, design, accessibility, technical updates | Staff time and website maintenance | Role-page visits, application starts, completions |
| Company blog | Candidates seeking deeper expertise | Show the work and company impact | Interviews, drafting, editing | Writer and subject-matter expert time | Engaged visits, role clicks, applications influenced by the channel |
| Talent-network members and past applicants | Build interest and share relevant openings | Segmentation, copy, sending | Staff time and email tools | Clicks, replies, unsubscribes, applications | |
| Job descriptions | Active job seekers | Clarify expectations and support applications | Role briefing, writing, updates | Staff time and related posting costs | Qualified applications and completion rate |
| Recruiter messages | Passive or targeted candidates | Start relevant hiring conversations | Research, personalization, follow-up | Recruiter time | Positive responses, screens, interviews |
| Professional and social channels | Broader talent audiences and employee networks | Build awareness and share employee perspectives | Posts, graphics, video, moderation | Production time and optional paid promotion | Careers-page visits, referrals, applications influenced by the channel |
Assign owners and approval steps so assets move from draft to publication without delays.
Make each approved interview work across channels. Turn it into a role-page update, blog post, social post, outreach message, and email to reduce repeat production work.
Set Team Roles and Address Hiring Capacity Gaps
Assign one owner per channel, one approver per asset, and one backup owner.
Each channel’s distribution plan should record the publisher, final approver, backup owner, publishing frequency, and tracking method.
Give hiring managers two business days to fact-check. If they miss the deadline, escalate to the backup owner. A missed deadline does not mean automatic approval.
Before publication, record checks for accuracy, employee consent, confidential information, accessibility, and working application links. Send sensitive compensation, benefits, or privacy claims to HR, legal, privacy, or compliance reviewers as needed.
If recruiter capacity is holding up hiring, use embedded recruiting support to keep roles moving. Keep content ownership with marketing or talent acquisition.
Use these channel owners and metrics in Step 5’s dashboard.
Step 5: Measure Hiring Results and Update Your Plan
Use the channel owners and content calendar from Step 4 to check which assets help you hire, not just attract attention.
Build a Recruitment Content Dashboard
Separate visibility from hiring results. Track performance using the role family, persona, channel, and stage labels from Steps 1 to 4. Bring content analytics and applicant tracking system (ATS) data into one monthly dashboard.
Keep the role priorities from Step 1 and content assets from Step 3. For each asset, record its audience, seniority, location, and recruitment stage alongside these three measurement levels.
| Measurement level | Metrics | Business relevance |
|---|---|---|
| Exposure | Reach, impressions, careers-page views, content page views, traffic source, video completion rate | Shows whether target talent finds and consumes content, not whether it helps you hire. |
| Candidate response | Click-through rate, application conversion rate, applications influenced by content, talent-community sign-ups | Shows whether content prompts a recruiting action. |
| Hiring outcome | Qualified applications, interview conversion, offer acceptance rate, time to fill, source quality, cost per hire | Links content to pipeline quality, hiring speed, and cost. |
Create a short metric dictionary before reporting. Keep the qualification criteria, application conversion definition, and definitions for time to fill and cost per hire from Step 1.
Calculate interview conversion as interviews ÷ qualified applications × 100. Calculate offer acceptance rate as accepted offers ÷ offers extended × 100. Report cost per hire in U.S. dollars and state which costs you include.[8] Judge channels by source quality, not volume alone.[7]
Use ATS fields and campaign links to track which assets candidates saw before applying. Label these applications influenced by content, rather than giving the asset all the credit. Cross-device activity, offline conversations, and privacy restrictions can leave gaps in tracking.[9]
Use the dashboard to decide what to keep, revise, or stop.
Review Results and Adjust Content Priorities
Review monthly; reassess quarterly. In monthly reviews, look for high-traffic pages with few applications, repeated candidate questions, drop-off points, and weak progression to interviews.
Each quarter, compare role family, seniority, location, topic, channel, and recruitment stage, but only where the sample is large enough to support decisions. Show counts alongside percentages. A small number of applications does not prove that a channel works or fails.
Before blaming content, note compensation changes, labor-market shifts, recruiter workload, and hiring-manager delays. These can affect hiring results even when content performs well.
If engagement is strong but qualified applications are weak, check audience fit, the call-to-action destination, form length, mobile usability, and technical errors. Compare the advertised responsibilities, compensation, location, work model, and requirements with the actual role. Candidate questions and recruiter feedback can point to missing information.
Keep an improvement backlog that records the problem, evidence, proposed change, owner, deadline, and metric to review next. Prioritize changes that improve qualified applications for your highest-priority roles. Use that evidence to revise headlines, calls to action, job information, compensation disclosures, or distribution channels, rather than relying on views alone.
Conclusion: Assign an Owner and Start Publishing
With the five steps in place, move from planning to delivery. Your recruitment content strategy should support priority hires, not publishing volume.
Assign one accountable owner and select one priority role. That person manages the content calendar, deadlines, approvals, channel distribution, and dashboard updates.
Start a two- to four-week publishing cycle. Before publishing, prepare a one-page brief covering the hiring need, target persona, EVP, proof points, channel, owner, deadline, and success metric. Use it to build one live hiring campaign, and schedule the first review before launch.
Launch the campaign for one role, track the results, and use what you learn to refine the next cycle.
If internal hiring capacity is holding up delivery, book a call with Rent a Recruiter to discuss embedded recruitment support.
FAQs
How much should we budget for recruitment content?
Treat recruitment content as an investment. Use performance data to guide spending, review ROI quarterly, and move 10% to 20% of your budget to the channels and content types delivering the best results.
Career page options range from free tools to custom builds costing $500 to $2,000. Track candidate source quality and cost per hire so you can see whether your spending supports your hiring goals.
How soon should we expect hiring results?
Hiring results depend on your strategy. Improving your career page can deliver results in as little as 30 days. Talent pools can activate candidates in 10 to 15 days, but typically need 3 to 6 months of steady effort to deliver a strong ROI.
Employer branding efforts can generate early engagement within a few months. Larger changes in hiring metrics, such as time-to-fill, generally take 6 to 12 months of consistent investment.
How can we measure success with few applicants?
When applicant volume is low, focus on candidate quality and progress through your hiring process, not application numbers. Track your interview-to-offer ratio and quality of hire to check whether your outreach brings in the right talent.
Review your application completion rate for friction that could cost you applicants. If candidates drop off, simplify the form to just name, email, and resume.