
If your offer approvals sit in email and Slack, you are losing time, control, and hires.
I’d build this around four rules: set clear approval owners, route standard offers one way and exceptions another, give each step a deadline, and review the process every quarter. That helps you cut admin time, reduce offer errors, and get offers out before slower internal steps cost you the hire. The article points to the risk in plain numbers: 52% of candidates accept a competing offer while waiting for a delayed offer letter, and 41% of lost offers go to employers that simply moved faster.
Here’s the short version:
- Set approval rights by role, not by person
- Use one default path for standard offers
- Send exceptions like pay above band, equity changes, or new-state remote hires to extra approvers
- Use 24-hour deadlines for each approval step
- Test rejection paths, out-of-office cover, and HRIS handoffs before go-live
- Track offer speed, acceptance rate, and error rate to spot delays and cost leaks
For CEOs, CFOs, HR leaders, and Talent Leaders, the point is simple: a defined offer workflow helps you protect budget and move faster without losing control. If you are scaling hiring using talent acquisition strategies across SaaS, Technology, IT, Fintech, Engineering, Security, Insurance, or Professional Services, this is one of the clearest ways to save time and tighten hiring process discipline.
Below, I’ll walk through what to set up and where the business impact shows up first.
Step 1: Define your approval rules and decision rights
Start with policy. If you automate before decision rights are clear, you end up with bad routing and offers stuck in review. Clear approval ownership makes automation move faster. It also stops your team from relying on one-off Slack messages, side emails, or manual fixes.
Once the policy is set, you can turn it into routing rules inside your recruiting system.
Assign approvers by role, not by person
Assign approval rights to roles, not named individuals. That means Recruiter, Hiring Manager, HR Business Partner, Finance Lead, and Department Head, rather than one specific person in each seat. This keeps approvals steady as teams shift or people leave the business [6][1].
Use dynamic routing fields so each requisition flows to the current hiring manager or requisition owner. That keeps the structure in place even when the person in the role changes.
This sounds small, but it has a direct business effect. You cut delays, avoid rerouting work by hand, and keep offers moving without rebuilding the process every time the org chart changes.
Set approval triggers for compensation and offer exceptions
Standard offers that sit inside pre-approved ranges should move with minimal friction. Exceptions should move up for extra review [4][5].
The goal is simple: route each offer to the lowest-level approver who can sign off on it. That keeps control in place without slowing down routine hiring.
| Scenario | Approver Role |
|---|---|
| Offer within approved salary band | Recruiter |
| Salary variance under 5% above band | Hiring Manager + HR |
| Salary variance 5% to 10% above band | Department VP / Finance |
| Sign-on bonus, relocation, or other one-time payment | Finance / Compensation Analyst |
| Equity or RSU exception | Compensation Committee or VP Compensation |
| Executive hire or offer outside approved pay bands | CEO / CFO |
Set clear triggers for:
- Pay outside band
- Sign-on bonuses
- Non-standard titles
- Remote work in new states
- Accelerated start dates
For each exception, require a short written justification [7][1].
Why does that matter? Because exceptions are where costs creep in. If your team treats every unusual offer as a special case with no clear rule, approval time stretches and spend gets harder to control.
When to use a default workflow vs. a custom workflow
Use one default workflow for standard offers. Keep it short. The point is to move routine approvals through the system without adding extra layers.
Then split standard offers from exception cases.
| Workflow type | Best for | Main benefit | Main risk |
|---|---|---|---|
| Default workflow | High-volume, standard roles | Faster routing and consistent approvals | May miss special approval needs |
| Custom workflow | Executive, exception, or offer outside approved pay bands | Better control for complex cases | More setup and maintenance |
Custom workflows make sense for executive roles, special departments, or high-risk locations where you need tighter oversight [4][6][2].
If an offer matches more than one custom workflow, set your system so the most specific rule wins. For example, a rule tied to both a specific team and location should override a broader department-level rule [6].
That kind of setup helps you avoid a common problem: blanket approval paths that are either too loose or too slow. A lean default workflow keeps day-to-day hiring moving. More detailed routing for edge cases gives you control where cost, compliance, or seniority is on the line.
sbb-itb-a23bd6a
Step 2: Build the workflow in your recruiting system
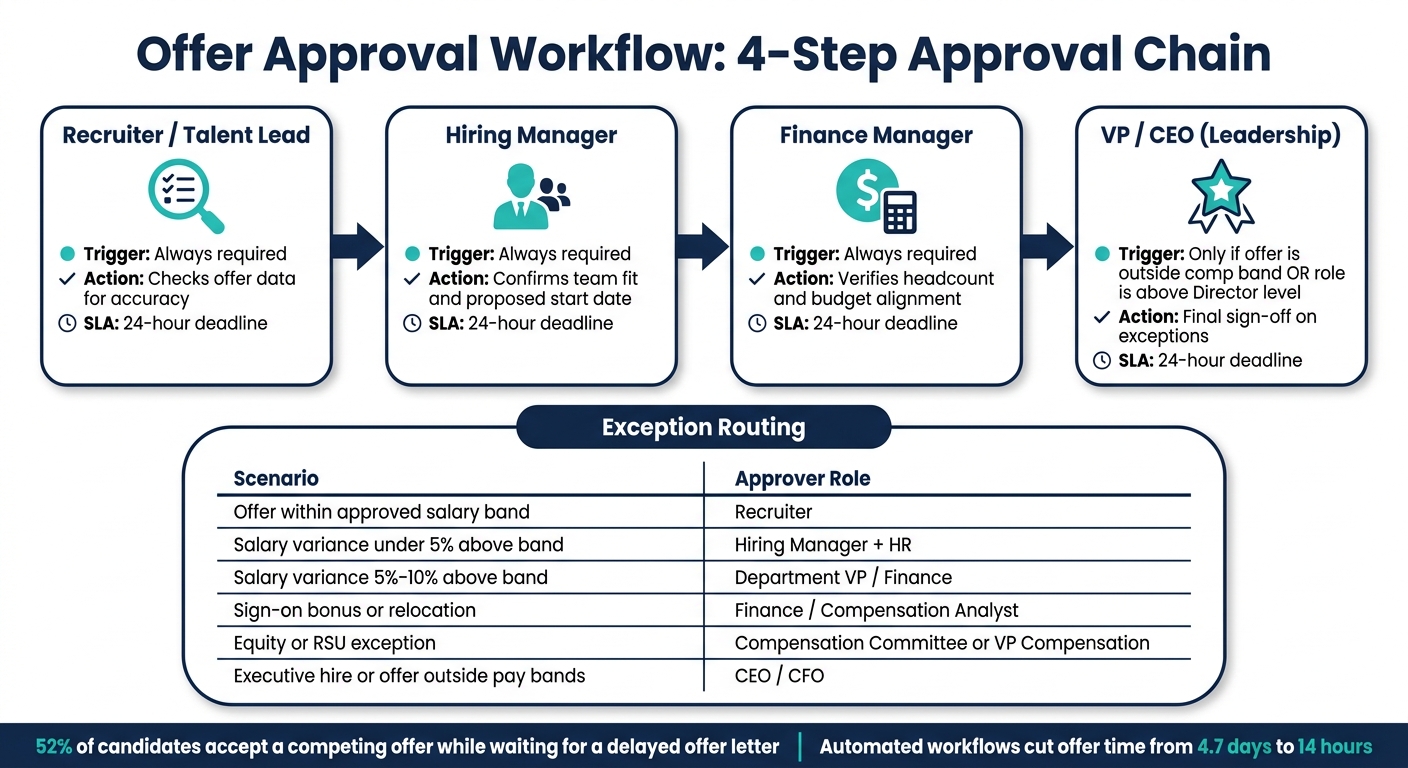
Offer Approval Workflow: 4-Step Process to Faster, Compliant Hiring
Once your approval rules are written down, the next job is to turn them into system logic. This is where policy becomes process.
Your goal is simple: offers should move on their own, with the right people pulled in at the right time. Use the roles, triggers, and exception rules from Step 1 to set the routing.
Set the approval chain and review order
For most teams, the best sequence is recruiter first, hiring manager second, finance third, and senior leadership only for exceptions.
That order works for a reason. Recruiters spot data issues before they hit senior stakeholders. Hiring managers confirm team fit and proposed start date. Finance checks budget and approved headcount. Leadership steps in only when the offer sits outside the approved pay band or the role is above Director level.
Use sequential routing as your default. It keeps accountability clear and avoids people reviewing half-finished offers. Use parallel routing only when more than one approver needs to act at the same time.
| Approval Step | Approver Type | When It’s Required |
|---|---|---|
| Step 1: Recruiter | Recruiter / Talent Lead | Always, checks for data accuracy |
| Step 2: Hiring Manager | Current job owner | Always, confirms team fit and start date |
| Step 3: Finance | Fixed approver (Finance Manager) | Always, verifies headcount and budget |
| Step 4: Leadership | Specific approver (VP/CEO) | Only if offer is outside comp band or level is above Director [6][8] |
Configure conditions, thresholds, and routing logic
Keep the logic tight. If the workflow gets too messy, people stop trusting it.
In most cases, compensation thresholds should drive the main triggers. Route to leadership only when the offer goes above the approved band. Use AND when you want tighter control. Use OR when you want a broader trigger [6].
For example, a Leadership step might turn on if the salary is above the approved band or the role is above Director level [6][8]. You should also set a fallback route for unmatched offers. That gives you cover for any case that does not fit a custom rule.
No offer should leave the system without at least one layer of review [8][6].
Define turnaround times, ownership, and escalation paths
Every approval step needs a deadline. A 24-hour SLA per step is a practical default for most roles, with automatic escalation to the approver’s manager if no action is taken in that window [1].
That matters more than many teams think. A stalled approval queue can quietly slow hiring, and that delay can cost you accepted offers.
Add two more safeguards:
- Require approvers to assign a substitute before going on leave [8][10]
- Give recruiters a live status view of the approval queue so they can update candidates without chasing people manually [1]
Once the workflow is live, test it against real offer scenarios before launch. A few test cases now can save you from approval delays, budget mistakes, and last-minute leadership escalations later.
Step 3: Test, launch, and maintain the process
Once routing is set up, test it with real offer scenarios before you open the workflow to live candidates. A workflow can look fine on paper and still break in practice. In fact, untested edge cases drive 23% of automation failures [11].
Test real scenarios before going live
Run a test offer through the full approval chain. Simulate candidate acceptance. Then check that downstream systems like HRIS and onboarding fire as expected [2][11].
Don’t stop at one clean test. Use a standard offer, a pay exception, an out-of-office handoff, and live data for currency, dates, long names, and job titles [11]. Then confirm routing, notifications, and downstream HRIS/onboarding triggers all work the way they should.
The goal is simple: every step should route properly, and no one should be able to skip a required approval before the offer moves forward.
Two checks often get missed.
- Confirm the system does not auto-approve a step when the recruiter sending the offer is also listed as an approver in the chain [9].
- Test the rejection flow so approvers must give a reason, and the recruiter is notified straight away [9][8].
A clean rejection path matters just as much as a clean approval path.
Then run a 30-day pilot on two or three high-volume roles.
Use that pilot to set your baseline for speed, accuracy, and rejection handling. If the process slows offers down, creates rework, or leaves gaps in approvals, you’ll see it before it affects a larger chunk of hiring activity.
Track the metrics that show whether the workflow is working
Once the workflow is live, a small set of metrics will tell you very quickly if it’s doing its job.
| Metric | What It Tells You | Target |
|---|---|---|
| Offer acceptance rate | Whether speed and compensation are competitive | 80% to 90% [3] |
| Time from final interview to offer sent | Overall process speed after a hiring decision | Under 48 hours [11] |
| Approval SLA per step | Where offers are getting stuck internally | Use the SLA defined in Step 2; flag any step that exceeds it [1][11] |
| Offer error rate | Accuracy of compensation, titles, and disclosures | Under 1% [11] |
If acceptance falls below 75%, that’s a strong sign something is adding friction at the offer stage [3]. Sometimes it’s pay. Sometimes it’s approval delays. Sometimes it’s both.
Speed matters more than many teams think. 41% of lost offers go to employers who simply moved faster [3].
For CEOs, CFOs, and HR leaders, these numbers do more than track process health. They show whether your workflow is helping you close hires faster, avoid admin drag, and cut the cost of offer-stage mistakes.
Review the workflow every quarter as hiring needs change
Approval workflows drift out of line faster than most teams expect. Review the workflow every quarter, and sample 10 to 15 offers each month to check formatting, accuracy, and compliance with current policies [11].
You should also revisit approvers, thresholds, and exception rules after any funding round, major headcount jump, or organisational restructure [2]. What worked at 100 employees may not work at 250.
Every revision, rejection, and approval should be logged with a timestamp so the process stays audit-ready [1][7].
Conclusion: Build a faster, more consistent offer approval process
A strong offer approval workflow comes down to four things: role-based rules, routing that fits your decision path, prelaunch testing, and a quarterly review cycle.
Get those pieces right, and offer approvals stop being a hiring bottleneck. They become a repeatable system your team can trust.
The business case is simple. Automated offer workflows can cut verbal-offer-to-signature time from 4.7 days to 14 hours [12]. For CEOs, CFOs, and HR leaders, that speed does more than move hiring along. It also tightens budget control. Every exception is documented, every move outside a compensation band needs a reason, and every approval is ready for audit.
If your process still runs on manual follow-ups, now is the time to remove that friction with a defined workflow. You can also take a recruitment health check to identify other hidden bottlenecks. If your team is still using email or Slack to push offers through, Rent a Recruiter can help you build a faster, more consistent approval process. Book a call at Rent a Recruiter to review your current workflow.
FAQs
What tools do I need to automate offer approvals?
You can automate offer approvals with built-in workflow features in ATS platforms like Lever, Breezy HR, Teamtailor, or Workable.
These systems let you set custom approval paths based on department, location, or compensation band. Once an offer is ready, it moves to the right people automatically, with live status tracking so you can see what’s approved, what’s stuck, and where delays are coming from.
That matters because slow approvals don’t just eat up time. They can delay start dates, drag out time-to-hire, and put accepted offers at risk.
If you’re working with a manual stack, Google Docs can handle drafting, and DocuSign can manage time-stamped, auditable sign-offs in a fixed order. It’s a simple setup, but it still gives you control and a clear paper trail.
If you need help putting those workflows in place, Rent a Recruiter can support high-growth companies in setting them up in a way that saves time and keeps offer approvals moving.
How should small teams handle exception approvals?
Use a clear delegation-of-authority framework so people know exactly who can approve which exceptions, including offers above standard compensation bands.
That matters more than most teams expect. When approval rights are vague, offers sit in limbo, hiring slows down, and good candidates drift away. A simple framework cuts that delay and gives you more control over compensation decisions.
To keep things moving, add a justification field for any offer outside the standard range. If someone wants approval for an exception, they should explain why. No back-and-forth. No vague requests. Just the context decision-makers need to act fast.
From there, custom workflows can route exceptions to the right stakeholders based on department, location, or compensation variance. That means Finance sees the cost impact, HR sees policy alignment, and hiring leaders see the hiring need, without dragging every case through the same approval path.
The payoff is simple: less admin, fewer bottlenecks, and faster offer approvals without losing control.
When should I update my offer approval workflow?
Update your offer approval workflow as soon as process debt starts to show up.
You’ll usually see it in a few clear ways: manual workarounds, stalled approvals, or an offer acceptance rate below 80%. When that happens, the process is no longer just a minor admin issue. It starts costing you time, slowing hiring, and putting offers at risk.
A good rule of thumb is to review the workflow quarterly. Track how long candidates sit in each hiring stage, ask recruiters where approvals get stuck, and watch for bottlenecks around non-standard compensation terms.
Pay close attention to inconsistent handling. If one manager pushes an exception through in a day while another takes a week, you don’t have a clean process. You have friction. And friction at offer stage can mean delayed starts, lost candidates, and more hiring effort for the same role.