ATS HRIS integration moves approved new-hire data into your HRIS without manual reentry, cutting admin work and reducing errors. We recommend starting with a named handoff owner, an agreed transfer trigger, and clear rules for which system controls each field.
Before you expand, test permissions, retries, and onboarding tasks, then reconcile a small live pilot. Measure minutes saved per hire, correction rates, and onboarding delays so you can judge the return, not just whether the connection works.
Our starting rule: <u>prove the handoff works before adding hiring volume</u>. Here’s how to plan, build, and check it.
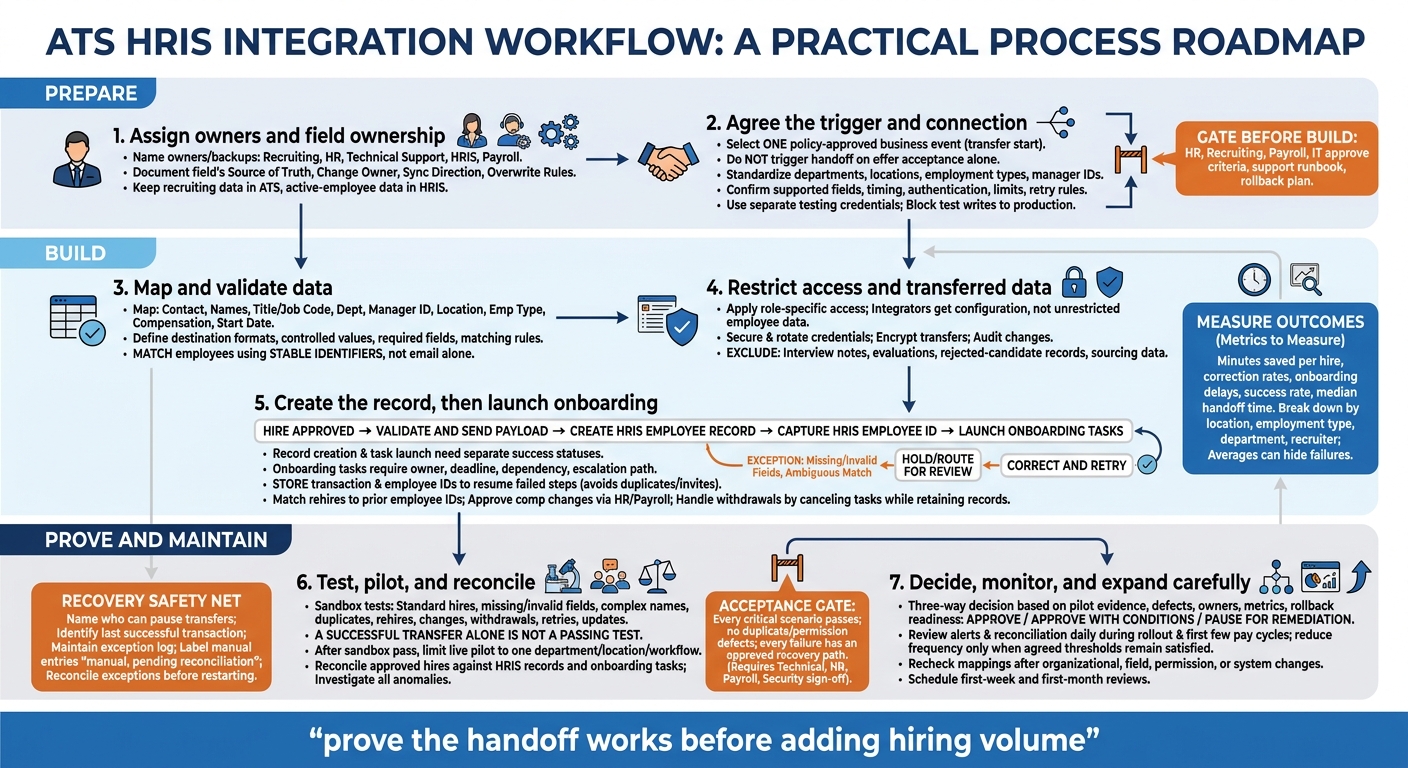
ATS HRIS Integration: From Approval to Scale
Assign Owners and Prepare the Connection
Set Data Ownership and Support Roles
Turn your handoff decision into a field-level ownership matrix. Keep recruiting data in the ATS and active-employee data in the HRIS.
For start date, manager, department, location, employment type, and compensation, record the source of truth, change owner, sync direction, and overwrite rules. Specify when ownership changes and whether later ATS edits can overwrite HRIS-confirmed values.[3][6][9]
Name owners and backups across recruiting, HR, technical support, HRIS, and payroll. Make clear who handles failed transfers, duplicates, access issues, and vendor escalation. Set a response target for urgent failures so problems do not sit unassigned.[4][8]
Use these owners and triggers to guide the field mapping, permissions, and error handling that move data into the HRIS.
Choose When New-Hire Data Transfers
Map the workflow from approval to onboarding, then select one business event that starts the transfer. Do not trigger the handoff on offer acceptance alone.
The trigger must follow company policy. If checks are pending, specify whether you allow a pre-hire record, onboarding access, or no record at all. Document how to handle start-date changes and cancellations.[4][6][9]
Before setup, standardize departments, locations, employment types, and manager IDs. Use controlled values rather than free-text entries to reduce mismatches during transfer.[4][6][9]
Check Connection and Testing Requirements
Check that the connection can move the required data at the agreed time, with the right controls. Approved hires should move into the HRIS without rekeying data.
Confirm support for a native integration, API, webhook, connector, or secure file transfer. Document supported fields, transfer direction, timing, update behavior, authentication, limits, retry rules, and ownership.[3][5][7][8]
Prepare a sandbox or isolated workflow with separate credentials and destinations. Block test writes to production employee or payroll records.[3][5][7][8]
Readiness checklist: Confirm owners and backups, field ownership, standardized reference records, transfer and onboarding-access rules, connection capabilities and limits, and separate testing access.
Get HR, recruiting, payroll, and IT approval for the acceptance criteria, support runbook, and rollback plan. This keeps each team aligned as hires move into onboarding.[3][5][8] Move into field mapping and permission design only after those approvals.
sbb-itb-a23bd6a
Map Data, Set Permissions, and Build the Handoff
Map Fields and Set Validation Rules
Check destination requirements and rate your recruitment process before configuring fields. Start with the table below, then document transformations, allowed blanks, controlled values, and matching rules. This helps prevent failed transfers and manual corrections.
Keep legal and preferred names separate, distinguish titles from job codes, and map location labels to destination codes. Display dates as MM/DD/YYYY, but use the API’s required date formats and time-zone rules. Match employees using stable identifiers, not email alone.
| ATS field | HRIS field | Format | Required? | Owner | Error action |
|---|---|---|---|---|---|
| Personal email and phone; work email when used for the invite | Contact details | Destination-supported format | Required for onboarding invite | Recruiting/HR | Flag invalid details; skip invite |
| Legal first and last name | Legal name fields | Text; preserve punctuation and suffixes | Yes | HR | Stop transfer; request correction |
| Job title/job code | Title/position code | Approved text or code | Yes | Hiring manager/HR | Reject unmapped value |
| Department | Department code | Controlled value | Yes | HR | Route for correction |
| Manager identifier | Manager employee ID | Employee ID, not display name | Where required | HR | Hold until matched |
| Work location | Location code | Approved code | Yes | HR | Reject invalid value |
| Employment type | Employment type | Approved destination value | Yes | HR | Block invalid value |
| Compensation | Pay rate, currency, frequency | Display $85,000; send rate, currency, and frequency separately | Where applicable | HR/payroll | Require review |
| Start date | Hire/start date | Display MM/DD/YYYY; send the API-required format | Yes | Recruiting/HR | Hold invalid dates |
Restrict Access and Limit Transferred Data
Once fields are mapped, control who can view, edit, and transmit each data set. Give recruiters correction access, managers the team information they need, HR access to employee records, payroll access to pay details, and IT only provisioning details. Integration administrators need configuration access, not unrestricted employee data.
Store service credentials in a secure credential manager and rotate them. Encrypt transfers and audit changes. Keep interview notes, evaluations, rejected-candidate records, and sourcing data out of the transfer.
Set restricted workflows for collecting, retaining, and deleting sensitive information. Any deletion must meet applicable recordkeeping obligations.
Create Employee Records and Start Onboarding
Treat employee-record creation and onboarding tasks as separate steps. Once the hire is approved, validate and send the payload, then capture the HRIS employee ID before launching onboarding. Record creation and task launch need separate success statuses. This lets your team see which step needs attention.
Use templates based on role, location, and employment type. Assign HR documentation, payroll setup, IT access and equipment, manager orientation, and new-hire forms. Each task needs an owner, deadline, dependency, and escalation path.
Handle Changes, Rehires, and Transfer Errors
Block transfers with missing required fields. Allow optional blanks only where the destination supports them, without accidentally clearing existing values. Send invalid values and ambiguous matches for review, and match rehires to their prior employee IDs.
Require HR/payroll approval for compensation changes. Start-date changes also need approval once downstream work begins. If a hire withdraws, cancel pending tasks while keeping required records.
Store transaction and employee IDs so retries resume failed steps without creating duplicate records or invites. Log failures and give every unresolved case a named owner.
Test, Launch, and Monitor the Integration
Test Standard Hires and Error Cases
Test the handoff you built, including mapped fields, permissions, trigger timing, and onboarding tasks. Use synthetic or masked data in a sandbox. Check the full flow: ATS approval, HRIS employee creation, onboarding tasks, notifications, access controls, and payroll handoff.
Cover standard hires, missing or invalid fields, complex names, duplicates, rehires, changed start dates, withdrawals, retries, and updates to existing HRIS records.
For each test, log the test ID, setup, expected and actual results, pass/fail status, error message, defect owner, fix, and retest date. A successful transfer alone is not a passing test.
Run a Pilot and Reconcile Records
Once sandbox testing passes, run one live workflow to check that the ATS and HRIS stay aligned in production. Limit the pilot to one department, location, or workflow, perhaps supported by a fractional recruiter to manage the transition.
Use stable identifiers to match approved hires to HRIS records and onboarding tasks. Investigate missing, duplicate, unexpected, or incorrect records. Check the recruiting-to-onboarding handoff against your baseline, comparing success rate, median handoff time, manual corrections, and onboarding delays.
Set acceptance criteria before testing: every critical scenario passes, no duplicate or permission defects remain open, and every failure has an approved recovery path. Before expanding, require technical and HR sign-off, plus payroll and security approval where relevant.
Define the fallback before go-live. Document who can pause transfers, identify the last successful transaction, and maintain the exception log. Label necessary manual entries “manual, pending reconciliation” and retain their source identifiers. Reconcile exceptions before restarting so manual work does not create duplicate records.
Fix Common Setup Problems
| Symptom | Likely cause | Fix now | Owner | Prevent |
|---|---|---|---|---|
| Missing required field | Field collected too late | Hold handoff until validated | Recruiting operations | Require field at approval |
| Invalid mapped value | Source and destination codes differ | Correct mapping | HRIS administrator | Review mappings after changes |
| Duplicate match | Weak matching rules | Pause for duplicate review | HRIS administrator | Test stable-ID matching |
| Delayed handoff | Queue backlog | Check queue; apply approved fallback | Integration owner | Monitor queue age |
| Failed update | Invalid effective date | Correct date; verify update | HR/payroll owner | Test effective dates |
| Permission mismatch | Wrong role | Correct role | Security/HRIS owner | Review access regularly |
Test the trigger boundary to catch records created before approval. Use the field-ownership register to resolve disputed fields, remove unnecessary payload data, and replace shared administrator access.
Generated tasks are not enough. Confirm accountable owners for payroll, benefits, IT, equipment, compliance tasks, and manager notifications. For teams lacking internal bandwidth, recruitment as a service can provide the necessary structure to manage these handoffs.
Maintain Alerts, Access, and Field Mappings
Once the pilot is stable, move from launch testing to routine monitoring and maintenance.
Assign named owners for failed-handoff alerts, reconciliation, credentials, audit logs, access reviews, and mapping changes. Review alerts and reconciliation daily during rollout and the first few pay cycles. Reduce the frequency only when error rate, correction rate, and handoff time remain within agreed thresholds.[10]
Recheck mappings after changes to departments, locations, employment types, required fields, permissions, or systems. Keep escalation contacts, pause/restart instructions, and recovery steps in a short runbook.
Launch checklist: retain test evidence and sign-offs, close unexplained reconciliation gaps, activate failure/backlog/authentication/duplicate alerts, test the fallback, confirm support ownership, and schedule first-week and first-month reviews.
Conclusion: Check Results Before Expanding
A live integration does not mean you’re ready to expand. You need accountable owners, approved mappings and permissions, tested trigger and error processes, and reconciled records.
Before expanding, check pilot accuracy, exceptions, onboarding completion, access, and reconciliation. Break down results by location, employment type, department, and recruiter. Averages can hide failures, so use these detailed results to make the go/no-go decision.
Record the decision against the pilot evidence: approve, approve with conditions, or pause for remediation. Include open defects, accountable owners, pilot metrics, a rollback plan, and the evidence supporting approval.[11]
FAQs
How do we estimate our ATS–HRIS integration costs?
Budget for more than subscriptions. Include software licenses, setup, data migration, training, maintenance, security or accessibility reviews, API access, governance, internal administration, and change control.
To assess ROI, compare annual benefits, such as savings from less manual work, against total integration costs. Run a pilot to measure administrative time and sync performance, then adjust your budget using those results, your hiring volume, and system complexity.
How long should our integration rollout take?
Plan for two weeks of initial setup, then a four- to eight-week pilot covering specific roles. Use the pilot to test scheduling, reminders, and handoffs between systems [1].
The work required depends on your tech stack, data volume, and API flexibility. Expand only when each stage meets its predefined targets. This phased approach, supported by 30-day pilot tests, helps confirm system stability and reliability before a full launch [1][2].
How do we calculate our integration’s ROI?
Compare a 30- to 60-day baseline with results after implementation. Track cost-per-hire (total recruiting costs ÷ hires), administrative hours saved × loaded hourly rate, and time-to-fill/time-to-hire.
Keep cash savings separate from recovered capacity. Don’t count the same saved hours in both.
Calculate ROI using:
ROI (%) = ((annual benefits − annual integration costs) ÷ annual integration costs) × 100
Include software subscriptions, setup, maintenance, and training in your costs.